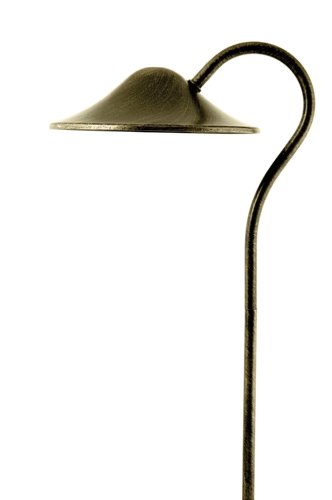
GL22680RB2 Add style and enhance the beauty of your home and garden with this landscape 2 pack aluminum round shade light of the highest professional quality. Features: -Landscape down light. -Finish: Rubbed Bronze. -Cast aluminum construction. -UV protected paint. -2 Aluminum round shade lights. -2 x 11W wedge bulb. -12 inch SPT-1 18 gauge wire with connector. -Compatible with 12-Volt lighting systems. -11 Watt T5 bulb included. -Great for durable outdoor use. -Dimensions: 20.67″ H x 10.03″ W x 7.87″ D.
Product Features
- Aluminum construction
- Rubbed bronze finish
- Includes 18 inches of wire, connector box and 11W wedge bulb
- Compatible with 12-Volt lighting systems
- Safe outdoor use


Great yard lights in a dark, woods area. We bought these lights to border the walkway leading up to our cabin in the woods. There is way too much shade for solar lights and we did not like the typical, plastic landscaping lights as they look so “ordinary”. Plus, birds are always knocking off the tops to get at the bugs that gather in the caps. These are metal, electric, no place to gather bugs and fit real well in a woodsy environment. The downward glow of light keeps the light down on the pathway where it is really needed and greatly reduces the light glow in the woods making it possible to still see the stars at night. Just perfect for our particular application. Well-made, easy to install, attractive and reasonably priced. What’s not to like?!!
couln’t be easier to install I ordered six of these along with a Malibu ML88T 88-Watt 12V supply (with timer) and 100′ of 14 gauge cable rated for underground use (note: in contrast to UF cable this type of cable uses stranded wire and has the form factor of lamp cord, which is necessary for being able to install the lights – it is a tad pricy for what it is, but presumably you are paying for insulation suitable for burying in the ground). These are very attractive, well-designed lights that use halogen bulbs (supplied), producing a soft, downward projected light that is ideal for sidewalks. In my case, I wanted lights along my front sidewalk to emphasize the contour of the walk as well as assist anyone using it at night. The effect is startlingly beautiful, with pools of light highlighting the walk’s S curve. I couldn’t be more pleased with both the aesthetic and the ease of installation.Each light comes with a screw on post, a screw on stake, and a short electrical lead with a “clip connector” that fits across the power cord. You simply run the power cord (in a shallow trench) to within a foot or so of where you’ve installed each light and attach each light’s clip connector to it. When you press the sides of the clip connector together, thin blades penetrate the insulation on each side to make the electrical connection and latches on the connector keep the connection from working loose after you’ve installed it. I did as suggested by the manufacturer and also wrapped each connection tightly with electrician’s tape (which adds some more insulation). The 12V supply is designed to be wall mounted where it can be plugged into a nearby outlet (it hangs by a single screw). It is suitable for exterior use with a GFCI protected outlet but needs reasonable protection from the elements (e.g., under a bit of overhang and far enough off the ground to avoid splash or immersion). Since my closest supply is a good 50′ from my first light, I took the extra step of burying 1/2″ PVC conduit for the wire from the supply to the first light in the string (to avoid accidentally slicing into it later in some miscellaneous yard project that involves digging). Most of the installation time is for getting the wire in the ground. I probably spent less than 30 minutes installing the actual lights and supply. If you can handle putting one of those clip on plugs onto a lamp cord, you can handle the electrical aspect of this system.For the more technically minded: keep in mind that each light draws 11 Watts (so my supply won’t support more than 8 lights); i.e., the power supply used needs to have enough capacity for the number of lights on the string. Also, wire gauge matters since thinner wire has more voltage drop (a problem with low voltage circuits over a distance). Thicker wire is needed for longer runs to reduce voltage drop (lower gauges are thicker). Voltage drop depends on the planned load and the load for 6 11 Watt bulbs is 66/12 = 5.5 amps. Over 100 feet the voltage drop for 16 gauge is 5.4V whereas for 12 gauge it is 2.1V. In my case, 75 feet with 14 gauge wire has a voltage drop of 2.5V, which means my bulbs will be dimmed a small amount. If you are thinking about doing a lot of lights I suggest doing some homework about how to organize the layout so that the variation in distance of each light from the power source is within 20-25 feet (and you might possibly need multiple power modules as well as techniques such as “spidering”). If you really want to do the math, the formula for voltage drop is load x 2 x length x rfactor, where the resistance factor for #16=0.00489, #14=0.00307, #12=0.00193, #10=0.00121, #8=0.000786. “load” is the total current need based on the Watts drawn by the fixtures and the length is the distance from the source to the last light on the run. If my run had been any longer I would probably have gone with 12 gauge wire. You can always safely use the thicker wire, it will just cost a little more.
Comments are disabled for this post.